Before & After

Who Brought the Cool Kid?

Before I get to today's post, let me just say- I'm writing this on my new lappy!  Last time I got a new computer was 6 years ago, so this is kinda super duper exciting for me.  And it came a day early!  Hooray!!! Ok, I'm done with that happy dance and I'll move on to another.  My future nephew's nursery furniture is D O N E!!!!  I delivered it to his room over the weekend and the parents-to-be couldn't be more happy (or so they tell me, although I doubt they'd tell me if they didn't like- that would be awkward- but I hope think they really are pleased).

If you're new here, or just have a bad memory- I had purchased 2 midcentury pieces that were in rough shape for $15 each to refinish so that my nephew will be the coolest newborn in the history of ever.

Dresser Before:

...and the dresser NOW:

and check out the side view:

Sexy, no?  Perfect to grow with a little boy!

The dresser wasn't alone, though.  It had a matching cabinet.  that started out looking like this:

Honestly, the closer you got to the original pieces, the worse they looked.  It was bad.  With MUCH MUCH sanding, I whipped them into shape and here's what the cabinet looks like today:

The original knobs didn't all match and that wasn't kosher, so I had to fix it.  4 of the knobs were kinda cool, but I couldn't find their companions.  I ended up finding 11 matching vintage knobs on ebay for $20 and I like them better than the original.  I'm sooo please with the result on these.  Of course they ended up being much more labor intensive than I planned (because everything ends up being more work than planned, because I suck at time planning) but I'd do it again- maybe for my next niece or nephew.  Now that the room has all it's furniture, it's time to get to the details (i.e. the fun part!!).

So to answer the question in the title of this post- Who brought the cool kid?  My sister did, obviously.

Jewelry Frames: the good, the bad, and the ugly

A few months ago, I got started on some earring/bracelet organization via a few small frames.  In addition to the small ones, I was planning to make some larger frames for necklaces and then post about them all.  I didn't want to share until it was all done, but I have a few lessons learned from this which will help me with the larger frames. So, here goes...

Aren't these thrift store frames beautiful?  $1.99 a piece.  Flower filled tubs and cross-stitched flowers are totally my style. (I hope you can see the dripping sarcasm)

I brought out my handy-dandy spray paint and unified the frames with a few coats of flat black.

I'd seen various jewelry frames on Pinterest that I wanted to try and replicate:

&

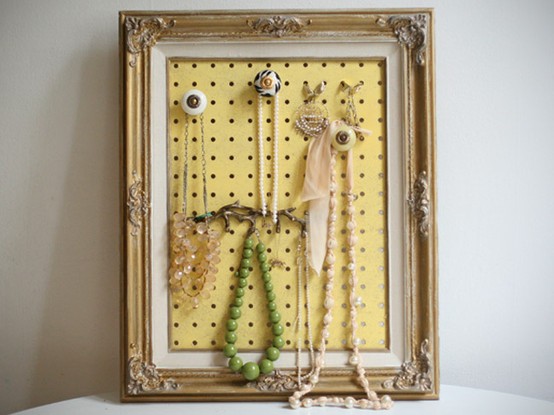
I decided to try out both of these methods: radiator mesh for earrings and peg board with knobs to hold bracelets.

Here's what I came up with:

Please excuse the quality wall behind.  The master bedroom is the ONLY room in the house with the original plaster (and the accompanying cracks and flaws).

The earrings frames with radiator mesh work like a charm.  The other one, however has some issues.  Well, not so much 'issues' as 'things that could work better.'  The first problem is asymmetry.  I didn't think ahead when I was cutting the peg board.  The holes are off center and thus the knobs I used are off centered.  Kinda makes me twitch, but I'll get over it.  Also, using peg board really didn't end up necessary for this.  I would be better off just using plywood.

The bigger issue, though, is that its not very practical.  When I screwed the knobs on, I made them tight to the peg board (like how you would install them on a cabinet).  That makes it look nice, but in practice- you really can't fit more than one bracelet comfortably on a knob- 2 if you're lucky.  For my next attempt, I will leave space between the knob and backer so I can actually use it as intended.

I hate it when things don't work out the way I plan, but that's how you learn, right?

Better than Mike Wolfe

Remember when I found this lamp at a tag sale for a whole $3?

Well, about a month ago, I was watching American Pickers and Mike Wolfe picked the same light!!  AAANNNDDD  he paid FOUR TIMES what I did at a whopping $12.  I totally get lucky every once in a while rock!

Take that Mike Wolfe! (And that is said with much adoration and respect of course, since I love American Pickers so much)

Before the weather turned totally rotten, my lamp got a much-needed coat of spray paint.  It's been hanging around for the past few months, patiently waiting to be rewired.  I decided when I got it, that my sexy deco desk light needed to stay true to itself.  That meant I had to hunt down a good source for cloth-covered wire.  I did a quick Google search and found Sundial Wire.  Jackpot!  Not only are they a local Massachusetts company, but their prices are fantastic!  It made me kind of giddy.

After New Years, I ordered 10 feet (extra just in case) of snazzy(that's right, I said snazzy) red cotton twisted wire

and a vintage style plug

Having never rewired anything before, I armed myself with tips from Handy Dad and watched this youtube clip: [youtube http://www.youtube.com/watch?v=cNcUst55t5s] It may have taken me a full hour to accomplish what she does in about 4 minutes, but I have a feeling that wasn't her first tango.

Check out what my deco desk lamp looks like today!

And look- it works!!