Projects

60 Minutes

Ugly sweater to cozy pillow in 60 minutes or less. I love me a quick project, and a quick, cheap project is even better!  I found this delightfully dated sweater at the thrift store for a whopping $3.99.

ugly sweater

The style may have been screaming "Cosby Show", but the pattern was screaming "make me a pillow!"  At least that's what I heard.

So I did.

I started with a 12 x 16 pillow form, and since I like my pillows overstuffed (no karate chopping in this house!)  I cut my fabric slightly smaller.

sweater pillow pieces

With the "right" sides together, I sewed 3 and a half sides, leaving an opening on one end to flip and stuff my pillow.

sweater pillow side progress

I then sewed the opening together by hand (and since both of my hands were occupied, I wasn't able to get a picture... I tried... it wasn't pretty)

And a cozy sweater pillow was born!

sweater pillow

And the cats rejoiced.

sweater pillow kitty model

Just kidding.  They were indifferent at best.  I'm just happy I was happy to bribe a cooperative model with a treat.

And there you have it- an ugly sweater- turned-cozy pillow in under an hour.

Have you tackled any speedy-but-gratifying diys lately?

Knitty Gritty

Rainy, gloomy, colder weather is not really the most motivating.  The only thing it's motivating me to do (aside from wear oversized sweatshirts and hibernate) is think about some knitting projects I'm planning.  (although as I write this, the sun is poking it's head out, warming up and making me a liar......) Anyway... I learned how to knit just over a year ago as part of a group through my old 9to5 job.  I wouldn't consider myself a knitter, although it can get addicting.  I've only completed a few projects, but I'm being requested a do-over on one.  A winter hat for the cutest nephew ever.

Cutest Nephew Winter Hat

Since my sister stubbornly insists on feeding this kid regularly, he is now too big for his lovingly made hat.  My dad has also requested one.  I need to make less cute hats next time so no one'll want them.  Oh well.  I'm thinking of making several of these hats (time permitting) in varied sizes.  How cute would it be if Eli, Daddy, & Papa all had versions of the same hat?  (not too cheesy, I hope)  Get knitting Auntie Karen!

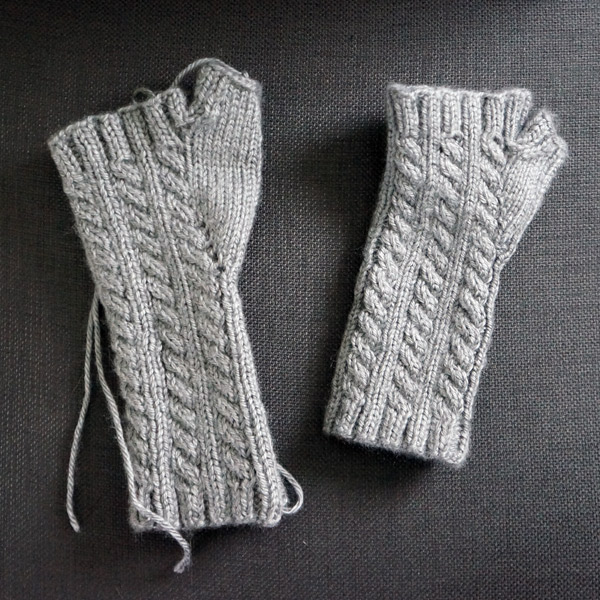
I also need to get on a project for myself that I started last year- cable knit fingerless gloves.  Last year I started a trial and error with this one.  I attempted to follow the pattern, but either I did it wrong or it needs some modification (maybe both).

My first try (the unfinished one) was with larger needles and has an oversized, cumbersome thumb.

cable knit fingerless gloves progress

The second try was with a smaller needle and I tried something different with the thumb- it was VERY close, but too tight.  Basically, I need to attempt to remember what improvising I did on this one, and replicate it with a larger needle or yarn.

cable knit fingerless glove

If it wasn't a hair too tight, it would be near perfect.  How cute is it?  Oh, and I would need to make a pair, not just one.  Details, details.

Here I go again talking about projects that I'm planning to do instead of actually doing.  I need to get my rear moving on personal projects, though- if our next flip-house prospect pans out, I'll only have a few weeks to check things off my to-do list.  Keep your fingers crossed for us!

Faux Sure

Sorry for starting off the post with a really bad pun (I'm really not sorry) but it's been stuck in my head the entire time I was putting this project together. Faux roman shades! and the last kitchen teaser post before the big reveal Friday!

Faux roman shade diy

Why are they faux?  Well, they don't actually work like shades- they just sit there and look pretty.  Tough job.

So, how did we get here?

When last we visited the kitchen windows, they were naked.

naked windows

I knew I wanted to soften the windows a bit with fabric, but functional shades just aren't necessary here.  I googled a bunch of faux shade tutorials and then did what I do best- made it up as I went along.

I started by cutting my fabric and a piece of liner to the proper size.

faux shade fabric

To line, I faced the good sides in and sewed 3 sides leaving the top open like a pillowcase.  Turn right side out and iron.

faux-shade-iron

Then comes the fun part- figuring out where the folds go.  I ended up folding the bottom up for a softer edge and adding only one additional fold.

faux-shade-folds

I started by pinning the folds, and tacked them into place with a needle and thread once I settled on them.  I sewed from the back and didn't go through the front layer of fabric, so you'll never see the stitches.

faux-shade-tack

I folded the top, unfinished end over until the shade was the height that worked best for the windows.  I didn't even bother to cut off the excess or finish it, since this will be hidden once installed.  And since I have windowS above the sink and not just one, rinse, repeat.

faux shade repeat

This fabric isn't as regular as a pattern as it seems at first glance, so getting it straight and even from shade to shade was a challenge.

Install was probably the quickest part of this process.  I used a pvc trim piece that I already had, cut it to the desired width and nailed the new shades into place.

faux shade tools

faux shade install

As you can see, the trim piece is hidden under the fabric and will never be seen.

Viola!  Such a simple project, but it totally helps the room feel more complete.

faux roman shades

Do you recognize this fabric from our dining room?  Once I brought the extra fabric into the new kitchen, I knew it needed to be in here instead- the colors work perfectly!  The purple ties in the dining room, and the grays pick up the green kitchen walls.  You can probably guess what that means for the dining room- chair recovering in the near future!

Have I inspired you to try faux roman shades?  Or have I just tortured you with another kitchen teaser and you're ready to jump through the computer and make me post the finished kitchen?

 **update** check out the finished kitchen HERE