Projects

Frankie: Week 15

I hope you enjoy these weekly updates as I learn to navigate through the business of flipping houses.  Check out other posts about Frankie the Fliphouse HERE. This is your last teaser post before Frankie's big reveal next week!  Are you excited!  I am!  So excited, in fact, that I may overuse the exclamation point in this post.  Don't say I didn't warn you.

Come hell or high water, I WILL have this house done and ready to list by the end of next week.  Especially since as of today we'll own 3 houses... what what??  #1, our house...#2, Frankie...and #3.....

flip 3 grover

That's right, flip #3!!!  Another ranch!  My specialty apparently.  Hubby's named him Grover (following our naming convention of using part of the street name).  I may just end up calling him Grove.  We shall see.  We won't be starting in on the house right away, so I'll have time to finish Frankie and take a short breather before jumping in with both feet.  Until then, I'm going to start dreaming about ripping out this delightfully modern bathroom.

flip 3 grover bath

Woof.  It even matches the exterior... as it should.....  My sledge hammer is going to be my bff.

But anyway, back to the current flip!  Frankie is almost all grown up and ready to leave the nest.

week 15 kitchen pendant

It's honestly hard for me to believe the transformation here- he's really a looker!!  I've got the upstairs at about 95%, just some touch-ups, cleaning, and minor staging needed.

Just look at all those check marks!  That's what flipping dreams are made of.

week 15 lists

Thankfully, I was able to fix my botched grout job with another layer of the same unsanded grout, now it's pretty and smooth as it was intended.  Yay! As the kitchen cleaning commenced, I started peeling the protective film off the appliances.  It was like unwrapping presents to reveal a sparkly kitchen.  Almost as gratifying as painting/refinishing furniture.  Almost.

week 15 kitchen stove

The bedrooms and bathroom all got inexpensive blinds for privacy.  My secret for making them look less cheap and more custom: trim them to fit inside the window frames!  No more messy bunch at the bottom!

week 15 bathroom

After touching up all the window trims and sills and polishing up the floors, I can't help but show you a teaser of the living room.

week 15 living room

When I started on this house, my goal was to make it clean, functional and livable- three things it was not before.  This house cleaned up better than even I expected- it just puts a smile on my face, and hopefully the next owner's.

My To Do list pretty much has one thing still left unchecked: the basement.  I have to tackle it with lots and lots and lots of paint, so I anticipate being covered in paint next week... maybe I'll even get a bit on the walls.  It will be so worth it, though, trust me!

The end is near!  I can't wait to show you guys Frankie's full transformation next Friday!!

Great Green

Guys, Frankie the Fliphouse is starting to look downright sexy as he gets cleaned up.  It's kind of exciting!  I can't WAIT to show you the final reveal.... next week (sorry). One thing that really makes the kitchen, though, is the dresser-turned-island.  It may have elicited a happy dance from me.  I hope whoever buys the house falls in love with this piece too, otherwise, I'm taking it with me!

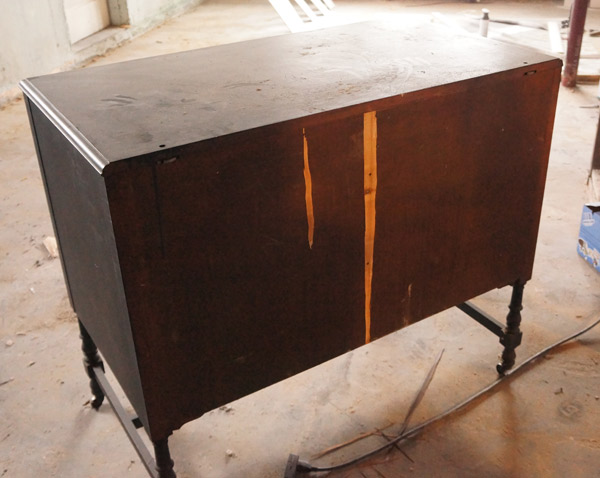
I found this dresser at the Habitat for Humanity ReStore for $62.50 (50%off!) and immediately knew this was the piece I had been looking for.  It was the right height and scale, AND as a bonus, it was already on wheels!

restore dresser before

restore dresser back before

I found these date stamps on the bottom of one of the drawers.

restore dresser date

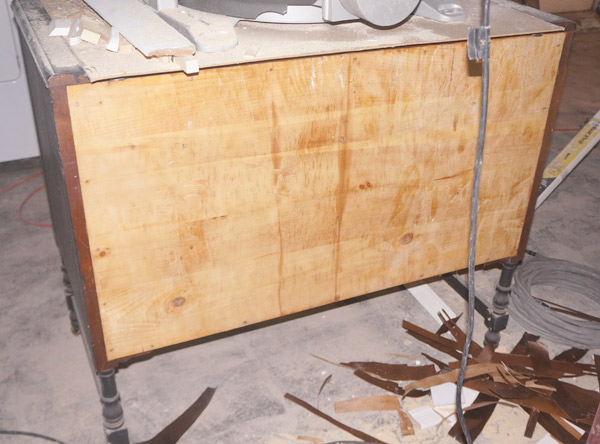
Luckily the dresser was in stellar shape for being 98 years old!  There were only 3 prep steps that I needed to do before painting.  First, I used a heat gun and scraper to rid the back of the cracked veneer.

restore dresser veneer

After the old veneer was gone, (prep step 2) I patched the blemishes and sanded.  The last prep step was removing the top.  Luckily it wasn't glued down, so I was able to remove a few screws I could reach and brute force the top off in no time.  Strong like bull.

restore dresser topless

The fun part was painting, putting on new hardware and attaching the butcher block top.

Drum roll please!!!  No? ok, well, here's what she's looking like today:

restore dresser island after 1

Hubba hubba, amIright?

I actually ended up using the darker/brighter color that I polled you guys about.  Once I changed the offensively colored CFLs in the house for more true-color bulbs it was the exact color I was hoping for.

restore dresser island closeup

I added a towel bar for added functionality.  Plus it gives me the ability to style it with a cute little hand towel (which, since I'm styling a house for sale, not to use..... this cute little towel, may actually be a pillow case.  sshhhhh, don't tell).

restore dresser island after 2

I'll break it down for you:

  • Dresser: $62.50
  • Butcher block from IKEA: $129
  • 2 paint "samples" matched to Benjamin Moore Medici Malachite: $6
  • Paint finishing wax (optional): $10
  • Knobs: $0!  (I raided my own knob collection)
  • Towel bar: $5
  • TOTAL: $212.50 (not including tax)

If I had used cabinets for an island, the price would have EASILY been double, most likely triple.  For a piece that takes the kitchen from nice to WOW, it's totally worth it!


Frankie: Week 14

I hope you enjoy these weekly updates as I learn to navigate through the business of flipping houses.  Check out other posts about Frankie the Fliphouse HERE. The last major item on the To Do list got checked off yesterday with about a dozen exclamation points- new windows!!

week 14 kitchen window

Despite the annoyance of scheduling the windows, the install guys were complete rock stars.  I'm resisting the temptation to show you a (very boring) series of window pics throughout the house.  Spoiler alert: they pretty much all look like this:

week 14 window

Seriously, though these are some sexy windows.  At least compared to their predecessors, remember?  They were even uglier up close.

w11-bedrooms

In the back 2 bedrooms, I did keep the existing vinyl windows on the right, so the new windows don't match them (sad trombone).  There was a method to my madness, though: I wanted the sides of the house to have all the same windows and I wasn't prepared to spend an extra $1000 to replace the already replaced, but matching windows on the back.  Never fear!  I have a solution!  Installing neutral white miniblinds will help to unify the windows in the bedrooms(which are also different sizes) and add privacy.

With all the major items off the list, I've been working through my list of what feels like a million little things.

After trimming down several doors to allow for the new floor heights (which the contractor had already supposedly trimmed...), I was finally able to get ALL the doors rehung and start putting the newly painted hardware back on.

week 14 doors

All the wonky electrical has now been fixed and updated throughout the house (by a pro!), I was finally able to glue & screw down the butcherblock island top,

week 14 island

and while the window install was happening upstairs, I finally got started on the basement.  Basement beginnings included removing about 3 kajillion nails from the ceiling, organizing everything left over from the upstairs work to keep/donate/trash piles, and prepping every single surface on the planet in the basement for paint.

The walls got prepped by scraping flaking paint and using a wire brush to remove all the efflorescence.  I'll follow this with paint designed to seal basement concrete walls.  I used this same process in the last flip and it seemed to do the job, so here's hoping it'll work again!

week 14 basement

With the basement cleanup finally started and all the major items with a check next to them on my list, I feel a huge weight lifted off me.  Fingers crossed, but I'm hoping this last leg of the flip will go swimmingly!