Projects

UP-Dated Built-in

WARNING: long post ahead!  But don't worry- it'll be informative AND have a few pretty pictures! When I'm coming up with my plans for my flips, there's a delicate balance between keeping original charm and getting rid of dated design features.

Exhibit A

Dated scalloped built in before

Built-in = original charm..... almost arm-deep = awkward......scallops = dated!

I think the scallops were the first thing I ripped out in the house.  I attempted to remove the fake wood paneling from all 3 sides of the shelves, but I just couldn't get in there without causing injury (even my attempts caused several bruises and band-aids).  For the past 4 months, the poor built-in has sat in this sorry state:

build-in-demo

build-in-demo-ceiling

But I had a plan for it!  And now, I think it's hitting all the right notes!

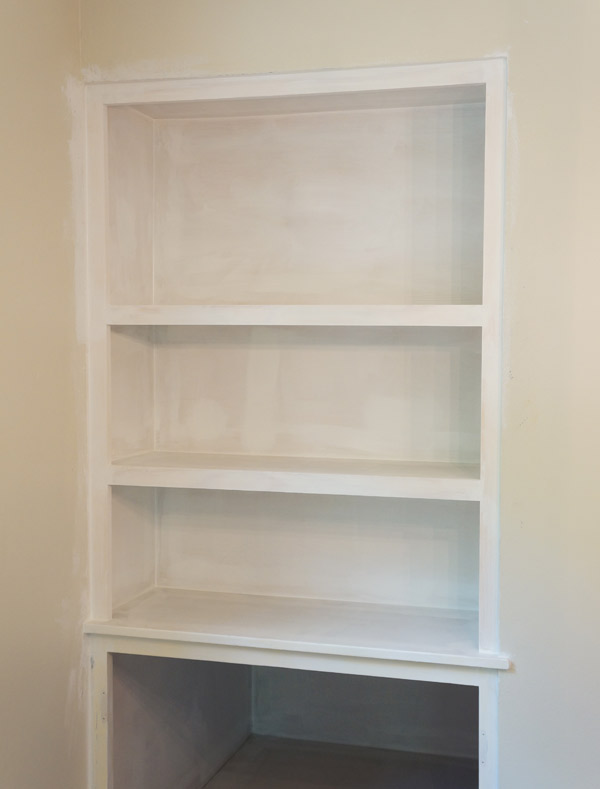
Dated built in after via year of serendipity

Original charm- CHECK

Fresh and clean-CHECK

Usable space-CHECK

Free of awkward and dated design features- CHECK CHECK!

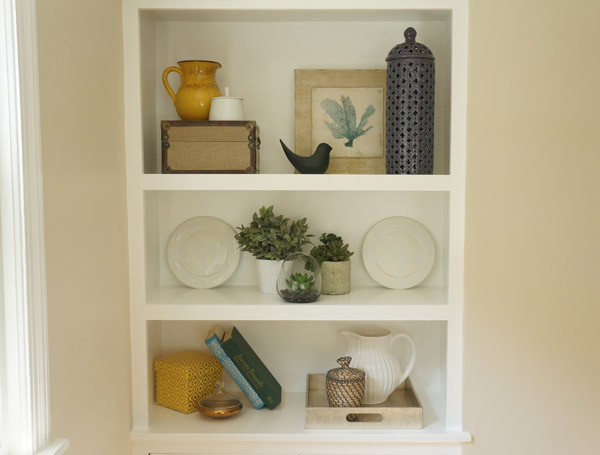
Dated built in styled via year of serendipity

It surprisingly only took me a day to build.  Wood working projects are probably the most fun for me- that and tiling.  You see things come together right before your eyes.


Supplies:

2x4s for structure

thin plywood for the sides, back and 'ceiling' on the top shelf (I actually used materials left over from the bathroom paneling)

1x2 pine decorative trim

Screws and nails


Half of the work in projects like this is just the figuring out and planning what you want to do.  The other half is playing with power tools (fun AND fun!)

My first step to make my plans happen was to create a new structure with 2x4s to reduce the size of the shelves.  I pre-drilled screw holes using my Kreg jig, however, even the best laid plans don't always work out.
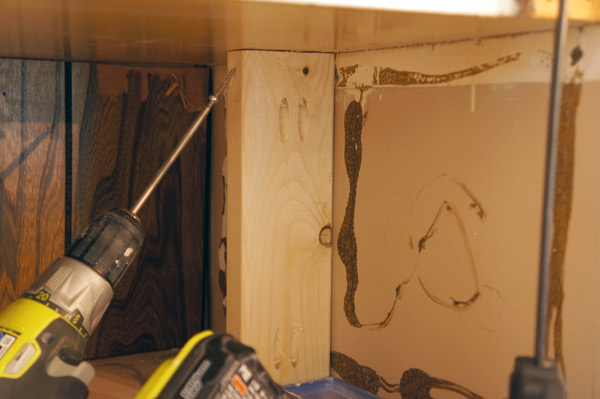
built-in-building

I forgot to take into account the size of the drill and it wouldn't fit in the 2 shorter shelves to allow me to use my carefully planned holes.  Womp womp.  Luckily, I was able to screw in the side and no one will be able to tell in the end.

When installing the 2x4s, I made sure to use my level so that each piece of the hidden structure would be straight.

built-in-structure

Next it was ply-wood's turn.

build-in-plywood

I put a piece of plywood on the new back as well as on both sides since the side walls were a bit damaged.  I'll admit, the back 'wall' between the 2x4s is a little bouncy, but since the back is purely decorative, I opted not to add additional structure.

build-in-plywood-done

Looking better already!  Next it was time for the finish trim.  This was the part that really modernized this project.  Sides first, then I measured in between.

built-in-trim1

To install the trim, I used my nail gun and 2" finish nails, to attach them both the the walls and the shelves.

built-in-trim2

To spare you additional boring pictures, I patched holes, primed, and then sanded before getting to caulking all the corners.  I used my go-to caulk method: a squeeze tube of caulk (easier to maneuver than a caulk gun), and a small bucket of water.  I use the bucket to both dunk my hand before wiping down a bead of caulk, but to also wash the caulk off my hand as I go- it get's very sticky otherwise.  The caulk magically filled all the gaps at the joints and gives it a professional, finished look.  In the pic below, just look at the contrast between the bottom, caulked shelf and the top uncaulked shelf.

built-in-caulk

Ta da!

built-in-sans-paint

Meanwhile across the room, the doors were getting fresh paint and new pulls.

built-in-paint-doors

Once all the caulk was dry, the built-in got several layers of white semi-gloss trim paint. I allowed the paint to dry overnight before I layered on the tchotchkes..... I mean styled it.

Updated built-in styled via year of serendipity

Updated built-in styled via year of Serendipity

Faux plants Dining room styled via year of serendipity

Just updating the built-in makes the entire open living/dining area look clean, fresh, and updated, but will still charm the pants off of any buyer.

Built-in styled and updated via year of serendipity

Get your wallet ready... you can buy this house NEXT WEEK!!!  Can you tell I'm excited to finish up?


Board & Batten Beginnings

In an effort to make a would-be VERY VERY long post into just a very long post, I'm breaking up my Board and Batten tutorial into 2 parts.  Welcome to part 1! After ripping down the old, damaged, ugly blue wall tile in this latest flip, the bathroom walls were in sorry shape.

grover-w3-bathroom

Walls like that leave only 2 options: tear them down and start over, OR cover them up.  Last flip I went with the first option, so this flip I decided to have a bit more fun with woodworking.

The planning is the most time consuming, brain consuming, and tedious part with lots of math.  First I planned how high I wanted it.  There was no science to it- I knew I wanted it high to cover all the wall damage and picked a tile grout line to align it with so it didn't feel arbitrary.  It ended up somewhere around 6 feet, but as long as it looks good to the eye, the actual measurement doesn't matter.  If you look closely at the beautiful image below, you can see my horizontal planning pencil line.  I also made sure to plan out where I wanted my verticals to be- I wanted one at the mid-point of the mirror and divided the wall accordingly.

ugly bathroom walls

After a trip to Home Depot to look at my wood options, I decided to use 1/4" thick sheets of plywood for my 'boards' and lattice pieces for my 'battens'.  The formula that I decided on for the trim pieces was a base board topped with a 2 1/2" wide lattice piece.  The top would also be the 2 1/2" lattice with 1 3/4" lattice for the verticals.  Here comes the fun part- math!  Lots of measuring and figuring helped me determine how much I would need, then I bought a little extra in case of user error.  Not that that would ever happen....

I find projects like this to be a lot of fun in all seriousness.  It's like designing a puzzle, then building said puzzle, with the result being a pretty room.  I get to use my brains and brawn!

Once I brought all the wood home, I started with the plywood.  I cut it to size, then 'dry fit' it in the space.

board and batten dry-fit

Prior to install, I decided to prime the pieces, so that put off install for a bit while I waited for them to dry.

boar painting

A bit of construction adhesive and a finish nail gun is all that's needed to install.  I recommend painting the walls behind first too, in order to minimize touch-ups and detail painting.

board and batten install tools

Looking better already!

board and batten install progress

Next I installed the horizontal pieces starting with the base boards that I pre-painted.  I didn't want to have to try and cut in with paint at the floor, or any difficult areas, so I made the decision early on that any piece that would be touching wall, floor or tile would get painted before installing.

base paint

After the base and adjacent lattice horizontals, I installed the top trim being extra special careful to line it up with my intended grout line and to keep it level around the room.  I had levels of a few different sizes that I was using, but the best tool is your eyes-  level or not, it needs to LOOK right, so step back often and make sure nothing's looking wonky.

board and batten horizontals

Verticals next!

I measured each piece individually to make sure everything fit properly.  I'd say this part was the most happy-dance-inducing because as I installed the verticals, every last bit of ugly wall behind disappeared.

board and batten part one progress

As always, perfection with these steps is pretty much impossible (not that I don't try!!).  No house , not even a brand new one, is going to be totally level and square, so gaps are inevitable.

board and batten progress close-up

Luckily, caulk and paint are pretty much my best friends when it comes to wood-working projects.  To quote my grandfather: "caulk and paint make a carpenter where he ain't."

This is where I leave you with part 1... stay tuned for part 2 and near finished bathroom next Monday!!


Plaster Patching

How to patch a swirled ceiling // Year of Serendipity I'm sure we've all seen it: a badly patched textured ceiling.  Joe Homeowner has a damaged textured ceiling and attempted to patch it himself.  He grabbed whatever patching compound he had and spread it over the damage in hopes no one would notice.  The resulting gloppy patch sticks out from the rest of the ceiling like a sore thumb.

For a hot second with this lastest flip, I thought I was free and clear with the textured ceilings- a few of the flat ceilings had issues, but the textured ones looked in good condition.... until I scraped the wallpaper in the hallway and discovered this gem.  The plaster layer of the ceiling was loose and started to crumble and fall the moment I touched it.

damaged plaster ceiling

No Joe Homeowner gloppy fix here!  Unless you're really looking for it, you'd never realize there was a patch! (cue sigh of relief here)

repaired plaster swirl ceiling

As it turns out, a large part of getting the patch to match (giggle) is in the magic coverup mixture:

plaster patch mix

Mix ceiling paint with joint compound until you have a mixture only slightly thinner than peanut butter.

ceiling patch mix

Once I had the mixture set, I went straight for the ceiling and got it perfect on the first try.  KIDDING!  I took a scrap of drywall and started testing out how to get the desired texture.  I tested out 3 different brushes that I had at the house.

texture testing

My verdict was to use the regular paint brush for application, then the large paint brush to texturize.  Now comes the ceiling... but not quite with the texture just yet.

I started with my ceiling by using regular (non-mixed with ceiling paint) joint compound to fill in where the plaster was missing.

ceiling patch

Once that dried, I sanded it and had a great base to texturize from.

sanded ceiling patch

Now comes the fun/difficult part.  As I mentioned above, I used a regular brush to spread the texturizing mixture, then used a large brush to add the correct scale to match the rest.  I paid careful attention to the directionality and pattern of the existing swirls, and tried my best to layer them and match them appropriately.

plaster swirl patch

This wasn't a first try result- I stepped back a few times and re-swirled, stepped back again..... etc... until it started looking like it should.

Not perfect, but definitely a good start.  The biggest difference between the new swirls and the old was the definition.  The new swirls were nice and sharp, the old had been painted over for 50 years.  To make the new swirls blend more, I took sandpaper to it once the patch was dry.  I feathered the edges out and dulled out some of the sharp texturing.

plaster swirl patch sanded

The last step was just to paint the entire hallway ceiling a crisp coat of white.  That was the true test: once everything was the same color, would the patch be noticeable?

plaster swirl ceiling

I'd call it a success!  Would I recommend this for a large blemish in the middle of your living room as a permanent fix?  Probably not.  In that case, skim-coating the entire ceiling would yield the best result... but as a quick temporary fix or a smaller patch in a less visible area (like mine), go for it!!

repaired plaster swirl ceiling

I'm rather proud of the finished result and how well it blends in with the old ceiling.  It's pretty near impossible to get the patch to match 100%, but I dare you to notice it when you're in the space.

Have you had any experiences (good or bad) in attempting to patch a textured ceiling?  I'd love to hear about it!