DIY

Reno Realities

Soon my kitchen renovation will be done and you won't have to hear about it anymore, I promise.  Until then, please forgive my one track mind. This kitchen is the first major renovation we've done in the house.  We've done a lot of small things, but nothing that completely displaced an entire room, and let me tell you- I was woefully unprepared.  I thought "I got this- I renovated an entire house, our kitchen will be no problem!"  Except when I was renovating Clark the flip house, I wasn't living there, AND I had direct access to a garage and walk-out basement to use as a staging area.  Our house is small- 1100sf- with no garage and no walk-out basement.  That's not meant to be a complaint whatsoever- I love our house and usually it's the absolutely perfect size for 2 adults and 2 cats.  Usually.

I'm sucking up a bit of my pride right now to show you the mess that is our house currently, to hopefully help you prepare if you are planning an upcoming reno.  You're routine will be totally turned on it's head, but knowing that it's temporary and that the end result is an amazing new kitchen is definitely what's propelling us through.

Here goes nothing:

Reno-dining-room

When the cabinets got delivered, we had no choice but to have them brought right into the house.  Like I said, no garage or other staging space available.  I expected the cabinets to take up the entire dining room.  I didn't expect them to take up the entire dining room and the entire kitchen.

Immediately after the cabinet delivery, I called my sister who is going through her own kitchen reno in just over a month.  My advice to her?  Clean your garage first!  Trust me.  I WISH I had a garage right now.  The way Home Depot (and IKEA) work for installation is once everything's delivered, only then will they try and get you on the schedule.  Hopefully it'll only be about a week, but it all depends on how busy they are- so until their schedule opens up (and I don't like not having control here), we get to live in a fort of cabinet boxes.

This is our only path from the living room to the kitchen and basement.

dining-room-reno-path

The kitchen wouldn't be so difficult to deal with if I wasn't still trying to prep the walls, paint the ceiling, trim, and walls, AND patch the floor where the old cabinets were removed.

kitchen-reno-mess2

Unfortunately, I had to wait until the old cabinets were gone to do all this prep and we were trying to keep kitchen down-time to a min by removing them as late as possible, so now it's an obstacle course.

kitchen-reno-mess1

The huge box in the center will be our amazing pantry cabinet next to the fridge, but it's so large it couldn't fit into the dining room.  The corner base cabinet had to be unboxed to even fit through the door of the house.  I will say, though- I'm so pleased with these cabinets already!  The colors are perfect and boy are they made well, especially in comparison to the cabinets I took out.  Hubby took a sledge hammer to the old base cabinets (my original plan was to donate, but they were well beyond their usable life) and with literally one swing, each cabinet fell apart.  That's quality construction right there, I tell you.

But I've got my eye on the prize-

design-manifest-kitchen-stained-wood-base-white-wall-cabinets

a completed, functional, stylish(!) kitchen- and its only a few weeks away!!

Are you planning to take on any renos in the near future?

kitchen image via Design Manifest


Hearth of the Home

hearth-after.jpg

I'm so excited- as of about an hour ago, we have new cabinets!!  They're still in boxes, though... in the dining room... and the kitchen... and one outside because the box couldn't fit through the door.  BUT, this means that we're closer to having a new functioning (and oh so pretty) kitchen, so I'll take it! As I've been spinning my wheels (or so it feels) on this kitchen renovation, my parents have been busy checking items off of their own to do list.  They've been in their new house for just shy of a year and have been working on putting their stamp on it.  Normally my mom is the instigator of projects (since she's as addicted to reading design blogs as I am and we all know how dangerous that can be), but one project that they both were equally gung ho about doing was their fireplace hearth.

Fire place before

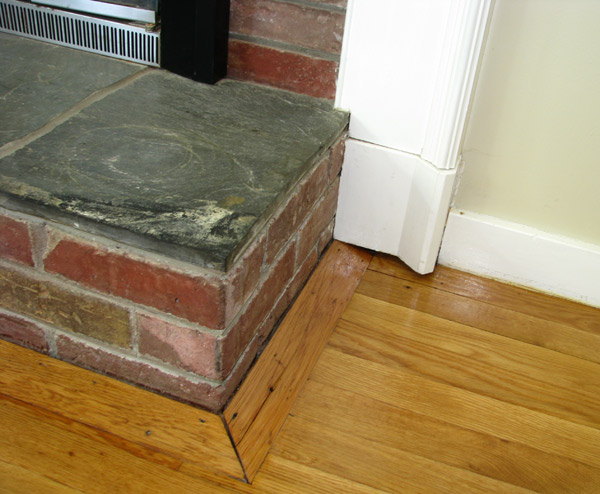
As you can see, the surround is beautiful, but was definitely an add on to the original fire place.  The surround didn't even extend to the floor and was 'camouflaged' with ill-fitting trim.   It was like sophisticated cottage meets hunting lodge, and not in any good opposites-attract kind of way.

Hearth before closeup

And isn't that top stone just beautiful?  That was Dad's favorite part.  Of course, by "favorite" I mean he wanted to take a sledge hammer to it.  Luckily, though, my parent's definitely had a vision of how to make the fire place look like one cohesive unit that had no more identity crisis.

Hearth process

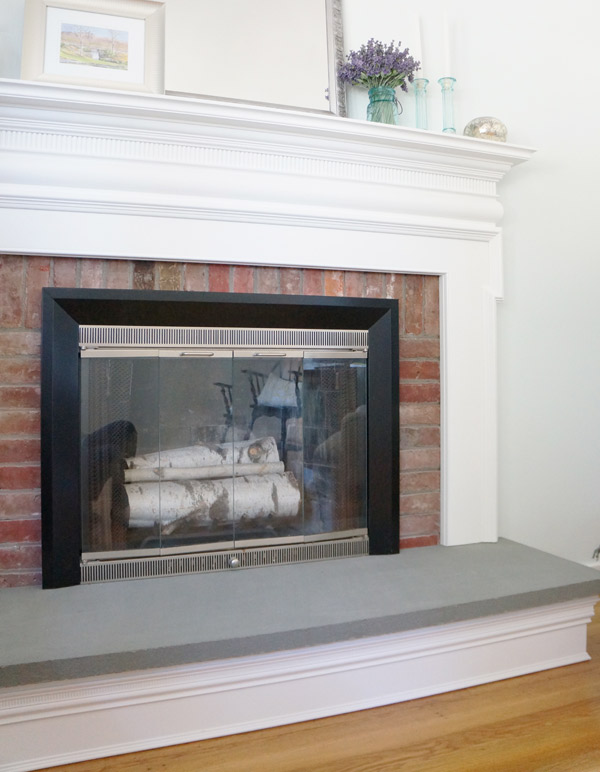
And Voila!  Now they have a fireplace that looks original and cohesive.  Quite the transformation!

Fire place after

Scroll back up and look at the befores.  I dare you.  You'll be amazed at the difference.  Even having seen it in person, I had forgotten how weird it looked when it started.  The finished result is pretty stellar in my opinion- it fits the room perfectly!

New-fire-place

What do you think of my parents' fireplace transformation?

Conquering Zombies & DIY

I've got DIY ADD again.  Bad blogger!  I'm actively working on 5 not so little projects and haven't finished a single one yet.  The biggest one of that is, of course, the kitchen.  A week from today, the countertops are getting uninstalled (to be reinstalled later), and a week from Wednesday, the cabinets get delivered!  Unfortunately the cabinets will have to sit around for a few days to a week before getting installed (by the pros), but I'm hoping that'll give me the time to paint the empty room and ceiling. This week is for the prep work.  Prep includes removing the uppers and soffit, removing the venting from the stove hood (which will be replaced with new smaller ducts), sanding and prepping the walls, and making the "zombie closet" smaller.

Why yes, I did say "zombie closet."  It's a cabinet with 3 doors that open up to a cavity above the basement stairs.

zombie-closet-before2

I think Hubby named this space when we first saw the house with our realtor.  He commented that he felt like a zombie was going to grab him if he reached it.  Although a bit melodramatic, the name stuck. The previous owner used it as a pantry, but it was more important for us to have a dishwasher and tuck the fridge into this corner.  For the past almost 3 years, the zombie closet has sat unused behind fridge.  The reason I'm revisiting it now is that the top door and trim is in the way of my new cabinets.  Not cool, zombie closet.

zombie-closet-before1

With the new cabinets, there will be a cabinet above the fridge as well as a pantry cabinet next to it (meaning that this whole mess will soon be hidden!).  My original thought was just to drywall over the in-the-way zombie closet, but there's a hardwired light in there, and I also can't justify closing off storage space in this tiny house.  Instead my solution is to make the upper door smaller so that it hides completely behind the fridge.

I started by removing the doors and trim pieces so I could devise my plan and start reframing the door.

zombie-closet-progress1

Since I don't move the fridge very often, I had totally forgotten how large this storage space was.  With our lack of an attic and our basement slowly filling up, I think this would be the perfect spot to store Christmas decorations that I only need to get at once a year.   Once I decided that, it helped me determine the new size for the door.  I'm keeping the door as large as possible that will still hide behind the fridge, meaning the new door will be approximately 24" x 24".

I only got as far as the planning and framing yesterday, though (and thankfully didn't get attacked by any undead monsters).  The new size is all framed out where the finish molding will be hidden behind the fridge and won't be in the way of the new cabinets.

zombie closet progress

Today's agenda includes patchworking drywall onto my new frame and cutting down and replacing the finish trim around where the new door will be.

Did I mention how excited I am for these new cabinets?  Do you have any cubbies in your house that you've given weird names?  It can't just be us.