DIY

Uncommercial Gifting

The week after Thanksgiving always feels like a game-changer to me.  Suddenly it's Christmas season filled with cheesy holiday songs (my absolute fave), holiday parties, gift shopping, and decorating.  The cheesy songs I have down pat, but the rest are still a work in progress.  I've been having a bit more fun with holiday shopping this year as I'm trying to go less commercial and more personal. Holiday shopping back story: A few years ago, my family had a holiday discussion and came to agreement that none of us need tons of gifts or lots of money spent on us.  With Hubby and me and my sister and brother in law now all in our 30s (!) we generally will purchase something when we need it and don't want to accumulate additional useless clutter.  In a mutual family agreement, we all decided to stop going overboard and pare down the Christmas gifting.  One or two well thought out gifts seem to mean more than lots of money spent on things we'd buy ourselves anyway.  With that in mind I've also been trying to buy one of a kind, hand-made, vintage, and generally unique holiday gifts that won't be tossed aside and forgotten when the season is over.

*This is NOT a sponsored post, these brands don't know me from a hole in the wall.  I just wanted to share some of my favorite unique holiday sources with you!*

Local gift shops, thrift shops, & antique shops are always a great place to start, but if you're a bit short on time, an epidemic that seems to be more prevalent in December, there are some amazing online resources to score that perfectly special gift.

One of my absolute personal favorites that seems to be a well-kept secret is Shoppe by Scoutmob

shoppe-by-scoutmob

necklace/mugs/print/embroidered art/canvas bin/t shirt/planter

Scoutmob sells small batch items by independent makers, guaranteeing that your loved one won't be receiving 3 of the same sweater.  They have everything from hand made furniture, to quirky T's, to amazing art for your wall.  They even have useful items that everyone needs like organic mustache wax and gourmet spicy ketchup... which just gave me another holiday gift idea....  I've honestly loved every single item that I've ever purchased from them (which includes clothes, jewelry, art, gifts....) and their customer service is beyond stellar.  "Oh, that personalized wedding gift came in damaged and the wedding is next week?  Sure, we'll get you a new one in time!" *actual experience*


This goes without saying but Etsy.  If you can't find it for sale hand-made on Etsy, maybe it doesn't exist.

etsy

necklace/garland/bunny/jars/paper dolls/print

From knitted amazingness to adorable stuffed animals to custom whatever-your-heart-desires, Etsy is a gift-buying wonderland.  Unlike Scoutmob where you purchase from them and then receive the goods from each maker, on Etsy, you're dealing directly with the creator.  This puts more power in your hands if you want to take your gifting to the next level.  Do you think your niece/daughter/friend would just LOVE that doll, but would be even more special if it had BLUE eyes? Message the maker and a special gift gets even better.


Or, for the crafty one in your life, what about a DIY kit or monthly subscription?

for-the-makers


For the Makers: planters/necklace/embroidery/hoops/bowl/kit

I can't say I have any personal experience with For the Makers yet, it just seems like such a great gift idea!  At For the Makers, you buy the kit to create some wonderfully unique items.  Mostly centered around home decor and jewelry (with a few random things in the mix) this is pretty awesome for the person on your list that loves to make but may not have the time to come up with the ideas or shop for all the pieces.  The gift of fun stylish projects to DIY?  I loves me a good DIY!


So there you have it, a few great new sources to jump start your holiday shopping and ensure that you give the best gifts on the block!

Do you love these sources as much as I do?  What other unique shops would you add to this list?


A Girls and Her Tools

Alternate title: 7 Handy Tools for the Handy Gal (or Guy) I like tools.  Tools are fun.  They help me wreck things, make things, and make things pretty.  Plus, I won't lie, I kind of enjoy shattering people's traditional gender roles "what do you mean my husband's tools?  MY tools.  He gets the kitchen."  Boom.  Welcome to 2014 ladies and gents!

A full list of tools that I find helpful would be near endless, but I thought it might be helpful to share a few of my favorite handy tools for DIY.

1.  Compressor

Harbor Freight Compressor

This one is necessary to accompany the next 2 of my favorite tools so I couldn't leave it out.  My compressor collection has raised to 2, a small portable one and a larger one with more power and both have their jobs.  If you're just starting into projects and tool collecting, I'd start with a small pancake compressor like this one from Harbor Freight.  They're light, portable, and have the power to do most small jobs.  A big need for my tools is portability since I don't have a workshop or garage where I can store them.  They're either in my basement or at a work site, so something helpful that's easy to move around gets 2 thumbs up from me.

2.  Brad nailer/nail gun

House-number-nail-gun

Speaking of tools to use with the compressor.  This guy is #1.  I'm not sure how I ever lived without my nail gun.  I think this may be my personal favorite: it's so easy to use- press into surface, pull the trigger.  For such an easy tool to use, you can make some mighty projects.  My entire built-in corner bookcase was put together with my nail gun and wood glue- and it's strong enough to climb on (although I'd rather you not).

living-room-sketch-reality

AND even though it's a rock star on large projects, no project is too small.  Use it to fix a loose piece of trim or like I did to beef up Millie's house numbers.

3.  Critter spray gun

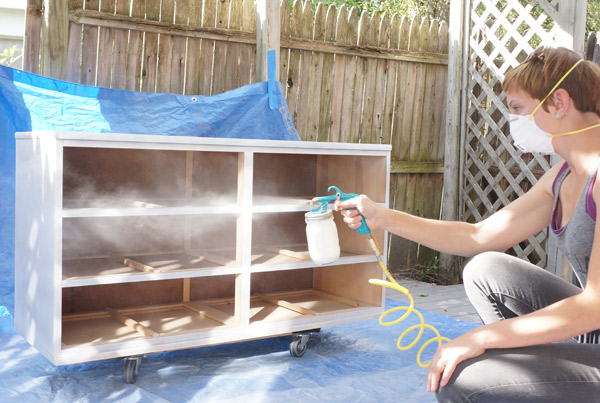
Compressor tool #2!  The Critter Sprayer is what I use my larger compressor for.  You can use a smaller one, but be prepared for it to run non-stop.  This little siphon paint gun does not get enough recognition in DIY land in my opinion.

critter-sprayer

Not only does it work like a champ when painting furniture, it uses mason jars to hold the paint.  Super duper handy for the DIYer.  When you're done for the day, you simply put a lid on the mason jar and you have pre-mixed paint just ready for the next coat or next project.  The only downfall is that you need to thin the paint like you do with any sprayer.  I use a little water and Floetrol and the finish comes out like a dream.  Just be careful not to put too much paint on at one time or you might get drips!

4.  Locking grip pliers

locking pliers

These aren't nearly as exciting as the previous tools, but I swear I find new uses for locking pliers daily.  The most useful task of this tool is removing stripped screws, headless nails, and rusted bolts.  I've also found myself using these as a vise to hold something steady, grip something too small for my fingers, and many more uses that I always forget.

5.  Foldable platform

bb043417-840b-43ee-b8ae-188f2a52f3bb_400

Again, not a glamorous player in the land of DIY but it's an unsung hero.  My sister gave me a foldable platform for Christmas a few years back and I couldn't be happier!  It's most obvious use is in lieu of a step ladder for painting and reaching.  It's lesser obvious use is my favorite- portable work bench.  When I modified the built-in for Grover the Fliphouse, my platform was indispensable. I would clamp the plywood to it while I cut it and clamp the 2x4s to it while I drilled my pocket holes.

kreg-platform

Aside from being a clamp-able surface, it also brings the work surface off of the ground.  You are welcome Back.

6.  Kreg Jig

kreg

I know I've mentioned the Kreg Jig before, but he's pretty awesome and you can see him in action in tool #5's pic above.  His skill set is rather limited- drill pocket holes for attaching 2 pieces of wood- but the things you can do with that limited skill set are in fact limitless.  He's one of my buddies when I'm building things.  Things like my franken-table

console-franken-table

and wine rack

wine-rack-angle

7.  Miter Saw

cbbe4231-7353-4c96-ab9b-213d672e5126_400

Last but certainly not least, a miter saw aka chop saw.  This is one of my more recently added tools, but has made my life so much easier!  Cutting crown molding? done.  Base boards? done.  Building furniture or built-ins? done.  You need it cut? Miter saw's your man. It's almost embarrassing how long I made due with a hand saw and jig saw.  While not a cheap tool, the right miter saw is totally worth it.

So there you have it!  I'd love to hear what you'd add to the list and what your favorite tools are!

A Numbered Statement

After several weeks of being numberless and confusing a delivery guy or 2, Millie once again is identifiable. Craftsman bungalow wood backed house number DIY via Year of Serendipity

After the painting finished up, I knew I needed to add a bit of a warmer touch to the house.  I debated putting shutters back, but ultimately decided that beefing up new house numbers would totally do the trick.  I love high impact projects for low wallet impact.

The font and the newly curb appealed terrace side both got numbers for less than $20 a piece.

Craftsman bungalow wood backed house number DIY via Year of Serendipity

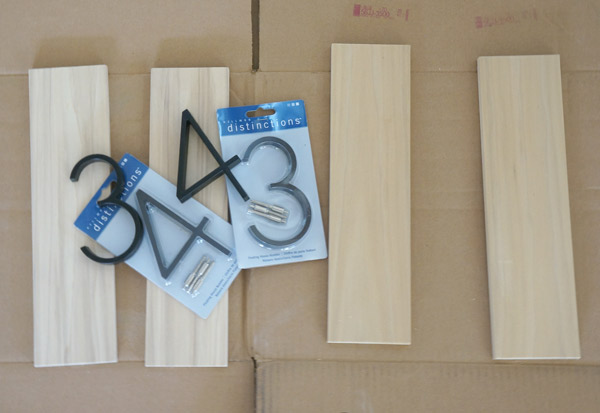
It all started with $6 Home Depot numbers, a piece of 1/2" poplar, and some stain.

DIY wood backed house number supplies via Year of Serendipity

I laid out the numbers to determine the size of the wood and cut 4 equal pieces- each house number backer would be 2 boards side by side.

DIY-house-number-stain

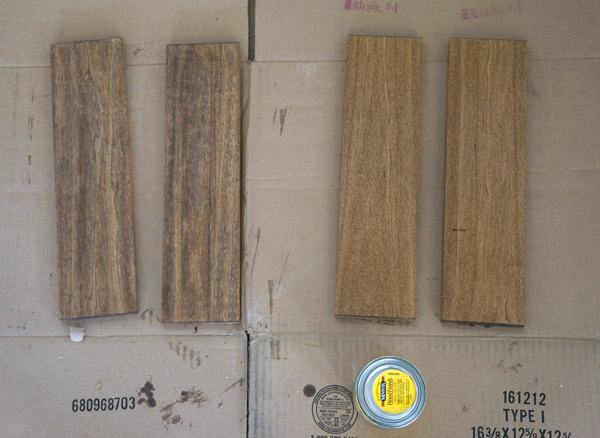
The 2 boards on the left were bought new, the right were left over from a previous project.  Although they're the same wood, I was surprised how differently they took the stain.  Luckily it didn't matter since 2 boards were going on one side of the house and 2 on the other.

At first my brain tried to over-complicate this installation.  I thought about using my kreg jig to attach the boards to one another and then attach the numbers before putting the assembly on the house, then about how to hang it on the house.....  Luckily I came to my senses and simplified.

First step was figuring out the placement on the porch posts.

House-number-placement

I decided that I wanted them just over a foot above the railings.  Using my level (which also has a handy ruler on it as well) I also figured out where to place the first board for the finished product to be centered.

DIY wood backed house number placement via Year of Serendipity

Holding that one board in place, I picked up my finish nail gun and placed a nail in the center of the board.

House-number-nail-gun

This holds it in place while I adjust it.  Even though I used my level, it's more important to have it parallel to the porch post.... which in a 100 year old house probably isn't 100% level anymore.  Once piece one looked level, I nailed piece number 2 next to it also with just one center nail.

DIY wood backed house number placement via Year of Serendipity

After stepping back and being pleased with their placement, I put a couple more nails into each board for stability.  I have to say, if you've never used a nail gun, you have no idea what you're missing.  I swear this is one of the most useful tools that I have!  Plus it's fun and helps me build pretty things.

With the backer board in place, it was time to install the house numbers themselves.

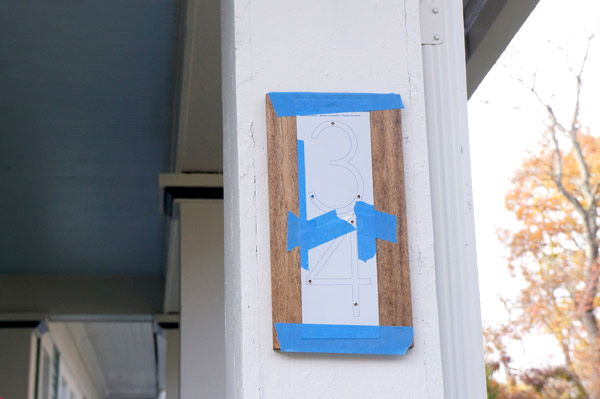
house-number-template

All I did here was follow the directions that came with the house numbers.  Place template, drill holes, put spacers onto numbers, glue/caulk spacers into drilled holes.

Craftsman bungalow wood backed house number DIY via Year of Serendipity

I'm kind of in love with them.  It's just what the outside of this house needed!

A big house needs house numbers that stand out.

Craftsman bungalow wood backed house number DIY via Year of Serendipity

Bonus if they make me smile.

Craftsman bungalow wood backed house number DIY via Year of Serendipity

Craftsman bungalow wood backed house number DIY via Year of Serendipity

The house is starting to coordinate with the fall decor delightfully.  I totally planned it that way...

Craftsman bungalow wood backed house number DIY via Year of Serendipity