upholstery

Franken-Chair Reupholstery Update

Reupholstery can be a very daunting project.  I was lucky enough last time around to be in a class where a professional helped to walk me through the steps with epic results, but making a go of it on my own had me hesitant and procrastinating a bit.  Since announcing my Franken-Chair plans to you almost 3 months ago, the disassembled pieces of my beloved chair have been floating around my house, hiding in corners and shoved in closets until I was ready to take on the reupholstery. Brimfield midcentury chair before

The key tip if you plan to tackle a reupholstery project?

  • Take LOTS of pictures.  Especially before you disassemble and while you disassemble.  Especially WHILE you disassemble.  Every.  Little.  Step.  You'll need to remember exactly how the pieces went together/were stapled/etc so you can put the puzzle back together.  That's the best way to look at it- a puzzle.  The pieces need to fit back in a certain way and if you forget that you need to attach tab A before tab B, you'll find yourself undoing and redoing the task repeatedly or trying to rack your brain what piece what supposed to go where.  Unless you're a pro and you have it all filed away in your memory, your camera is your upholstery bff.

Since I intended on marrying the chair above with the antique base below, I did have to modify the bottom just a bit.

antique chair base

Some of the fiberglass on the bottom would need to be cut back to allow the base to sit flat on the chair.  Handy dad lent me a hand in making sure this plan was viable and that cutting back the fiberglass wouldn't compromise the structure in any way.  *NOTE* I made sure before modifying the chair that I wasn't working with a priceless antique.  Luckily, my chair is a very close replica of the expensive version, so my modifications aren't blasphemous.

This is a view from underneath the chair and you can see the pencil line where we were cutting the fiberglass.  If I ever want to reattach the old legs, I may need to replace the piece that we removed, so it's not finding it's way into the trash yet.

vintage chair bottom

All it took was a hack saw and a bit of muscle to cut the fiberglass, although I would recommend this ALWAYS be done outside.

vintage chair fiberglass cut

Once the structure was ready for it's pairing, I needed to get the upper portion ready.  This is where all the pictures come in.  I carefully unstapled all the upholstery from the frame and the main, visible upholstery came off in 2 parts, almost like a slipcover.

vintage chair upholstery

I very carefully ripped apart all the seams on the old upholstery so that I could use the pieces as a pattern for my new upholstery.  If you're working with a printed fabric like I am, you need to pay attention to how the pattern lines up with the print.

vintage chair reupholstery 'pattern'

Then came the sewing.  Sewing piping out of the fabric, then using the 'pattern' to recreate the slipcover that I removed from the chair.  If you've sewn before and can follow a pattern, that's basically what this was.

Before I could replace my 'slipcover' I needed to address the seat cushion.  The back cushion was still in good shape, amazingly, but the seat foam not so much.  No one wants to be sitting on this.  It was like the Mohave desert.  The fluffy stuff around the edges is just cotton, not something growing, but getting this foam off the wood seat was not a clean, or pleasant process.

mohave desert old seat foam

Luckily, once the desert was removed, cutting a new seat out of super high density foam was simple.  I used a dollar store bread knife and traced the seat.  I wasn't worried about perfection because I'll be wrapping the seat with extra cotton and batting to fill out the seat and give it a bit of extra cush.

cutting new seat foam

So that's where the chair currently stands.  Upholstery is sewn, the seat foam has been replaced and the structure has been modified to allow for it's new base.  Before I can staple the 'slipcover' onto the chair and make it look finished instead of like a kid wearing his big brother's clothes, I'll be adding a a bit more cotton and batting to give this old chair a cushy, squishy, and polished new appearance.

Antique chair 'slipcover' reupholstery project via Year of Serendipity

I'm so eager to get this chair finished so I can use it in my office!  The dining chair that I've been working in for the past few months just isn't cutting it.

Do you have any daunting projects that you've been inching away at?  It's like eating an elephant...


Meanwhile at Brimfield

....I bought a chair.  Anyone surprised?  Although you may have caught a glimpse on instagram, lets first explore things I didn't purchase amongst the junky vintage amazingness that is Brimfield, MA. Brimfield antiques, Spring 2014

It was a rainy, rotten day on Friday, so there were a good lot of vendors that weren't even open and we probably missed a ton, but it was still a blast!  It is so easy to go into awesomeness overload (or junk overload, you pick)...

Brimfield mcm cabinet, Spring 2014

The pinkish cabinet with glass doors on top was only $30!  I tried to rack my brain for a place for it, but realized, sadly, that I could not give it a home- I hope someone did!

At the end of the day, I had spent only $28, but it was $28 very well spend if you ask me!

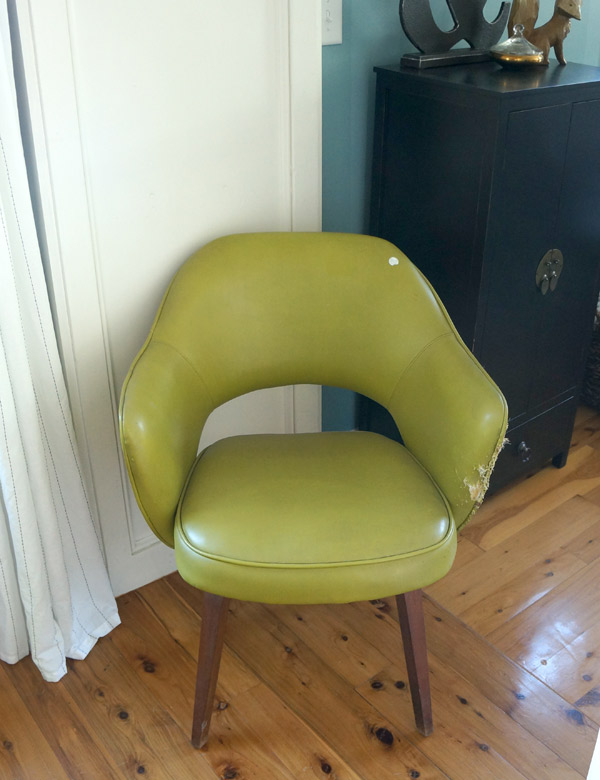
$25 went to this amazing mid-century chair.   I'm not just a member of Chair Hoarders Anonymous, I'm the founder and president.

Brimfield MCM Chair Before 1

I don't think a chair has ever needed to be reupholstered more- the vinyl has been scratched right through to the wood below.

Brimfield MCM Chair Before 2

It also kinda stinks (just musty.... it was out in the rain after all), but I don't care, I love it!  I had actually walked away from it, but it kept nagging at me, so I went back and haggled him down $10. #alwayshaggle

Brimfield MCM Chair Before 3

It's very sturdy, heavy, and well built.  It's only issue really, is the upholstery, which I think I can do something about.  I hope my reupholstery skills are up to the task!  This style of chair will require much more sewing and precision than the last, but I'm up for the challenge!  I'm thinking a sexy but studious gray tweed might be in order, don't you agree?

I love hate to keep you in suspense, but I'm not going to show you today what I spend the remaining $3 of my $28 purchases on.  It's in the process of getting a mini-makeover, so pop back Wednesday to see my $3 find all spruced up and styled!

I'm already looking forward to the Brimfield antique show's next go around in July!  Did you get a chance to go this time?  If so, I'd love to see your treasures!

New Old Chair

Monday, you got a peak at the reveal of my newly reupholstered antique chair, so I though today I'd show you the full transformation. We inherited our awesome chair from a friend.  It had been in his family for longer than he'd been alive, but he had no place for it.  After an unfortunate incident with the Queen (Daisy), the non-colorfast seat needed washing.  For 4 years, we've had the chair in our apartment, and then various rooms of our house in it's not-so-fresh red/pink state.

Antique chair before

I was so excited when the waitlist I had been on allowed me to get into an awesome reupholstery class last minute at the Eliot School in Boston (not a paid endorsement, they were just awesome and if you live in the area, check them out and the classes they offer!  Do it!)

Antique red chair before

The first class was painful, where I started ripping my beloved chair apart, but the rebuilding was so gratifying!

Antique chair progress 1

Antique chair progress 2

I am not even going to pretend to be any kind of expert at reupholstering, but I will tell you that the key is to pay attention as you're disassembling and take note of how everything is attached.  Then do that with your new materials and fabrics.  Simple, right? ha!

Antique chair progress 3

Antique chair progress 4

Antique chair reupholstery progress

Antique chair reupholstery progress 2

Antique chair reupholstery progress 3

Antique chair reupholstery progress 4

Once the fabric was all attached and trimmed, the final steps were to glue on the double-welt (to hide the staples) and sew a cushion.

LOVE!

Reupholstered antique ikat chair after

Sometimes it works to bribe furry models with treats.  Sometimes.

Reupholstered antique ikat chair cat

Reupholstered antique ikat chair

If you're anything like me, you love a side by side before and after.

Reupholstered antique ikat chair before and after

How's that for a transformation??

antique ikat chair after

I'm so pleased to be able to give the chair a new life!