DIY

Pockets and Tacks

My tiny little office really needs an injection of usefulness.  If you remember, this is my pseudo-desk area on top of my IKEA expedit cubbies. deco tray desk

It (along with the rest of our second floor) has BIG plans in store for this winter after my darling Millie is through with renovations.  I'll give you a hint.  It involves a long awaited allergy-friendly flooring switch-up.  Until that catalyst starts a new slew of renos into my house, I need to make this tiny room work.  It serves as my office, our extra TV room, and our rarely used ellipticals home.  With the ball rolling on my interiors business, Copper Dot Interiors, I need a place for notes, lists, swatches, ideas and inspiration.  All this has been cluttering the little bit of desk that I do have and causing me to avoid using the desk all together.  Kind of defeats the purpose.

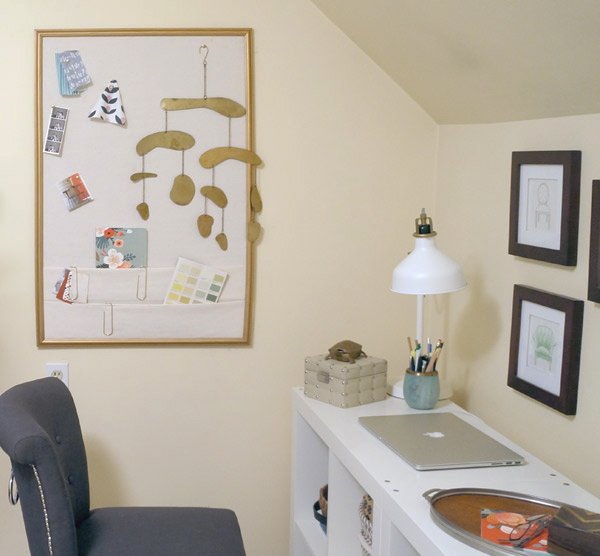
Luckily, a few errands and a few hours later, I put together exactly what this space currently needs to function: a fabric covered bulletin board, complete with pockets.

diy-tack-board

Not only was it a very gloomy weekend here and all of my photos were dark and gloomy, I still haven't figured out a way to take quality photos in this itsy space.  There is one window, but with the homes orientation, not much natural light comes in.  One day I'll figure it out and WOW you will my stunning office images.  Until that day, I'll photoshop them until they don't look weird.

So, bulletin board!

DIY-bulletin-board

I'm impatiently eagerly awaiting finding the PERFECT frame for this... something like this bulletin board on The Everygirl:

theeverygirl-pbteen-20s-1

but until I come across that gem, I decided to work with that was available- a $6 thrift store frame.

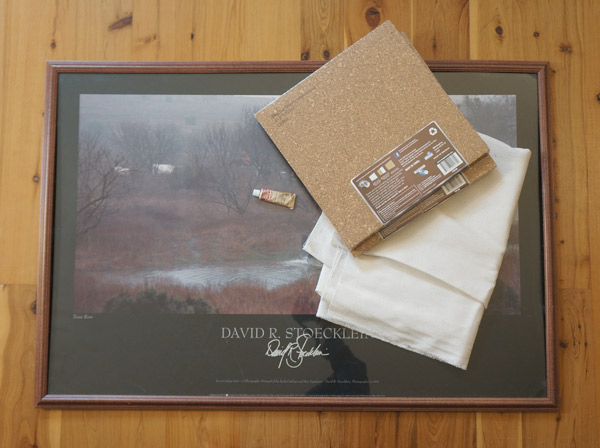
bulletin-board-supplies

The poster got sacrificed to the DIY gods.  In addition to a large frame- mine is 2'x4', I also used cork board tiles, a tube of rub n' buff, and my chosen fabric.

The frame got disassembled and the foam core backing got reused.  I used the double-stick adhesive squares that came with the cork tiles and stuck them onto the foam core.

DIY-bulletin-board-progress

Once the surface was covered, I trimmed the cork on a few of the edges where it overhung the foam.  Next, I sprayed the whole area with spray adhesive.  This helps the fabric grip and not bubble or wrinkle, but it still allows for repositioning.  The fabric is much dreamier in person.  It's the perfect texture with a slight natural fleck in the color.  I wish it showed more in the pics.

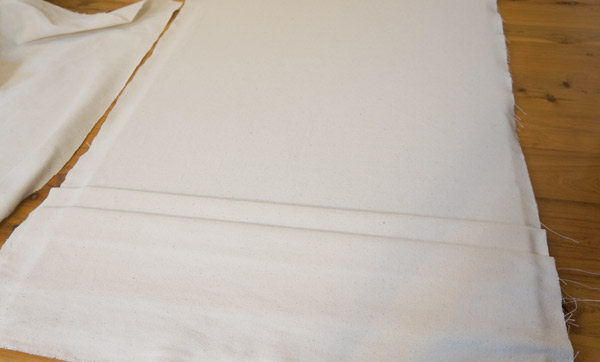
DIY-bulletin-board-fabric

The pockets are created by folding the fabric- the deeper the folds, the deeper the pockets.  I knew these would be necessary for function and keeping clutter off of my desk top but not out of mind.  After the fabric was placed, the spray adhesive held well enough to allow me to flip the foam core/cork board over and staple the fabric around it.

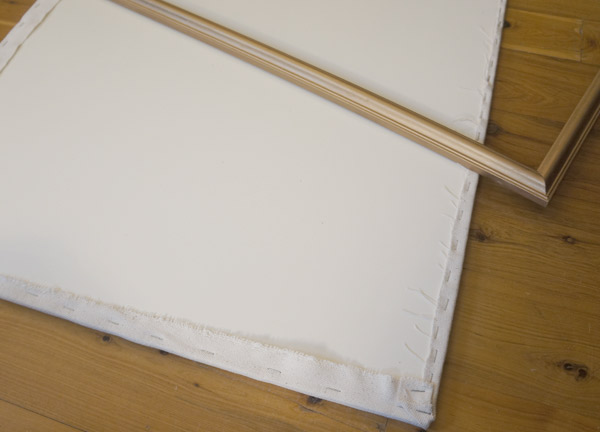
DIY-bulletin-board-pieces

Magically, while I created the bulletin board, the plastic faux wood frame suddenly turned to gold!  Ok, not so suddenly or magically.  After disassembling the frame back at step 1, I used rub n buff in antique gold to make the frame shinier and less fake-wood-looking.  Once my board was wrapped and my frame was goldified, I popped the board back into the frame and used high-tech duck tape to hold everything together on the back.  I used my favorite 3m picture mounting strips to hang it (not sponsored, just love them) and voila!

DIY-bulletin-board-office

Since this is most likely a temporary frame until the right one pops into my life, I'll most likely be reworking this along with the entire room in the near future.  I can see the room now, new desk chair, paint, window treatments, rug.... she'll be a beaut!!

DIY-bulletin-board

Until then though, I have a super functional and easy on the eyes DIY fabric covered bulletin board!


Make it Work: Thrifted Art

In the series, Make it Work , I show you how to take a seemingly random thrifted find and hypothetically 'make it work' in an awesome space.  WWTGD (What would Tim Gunn do?) On to today's Make it Work!

I've been scouring Craigslist a lot lately.  I mean a lot even for me (and that's an awful lot for most people).  Aside from a few things that will probably work for eventually staging Millie, I haven't been coming across any total gems.  Sometimes not being WOWed by a piece gives you the opportunity to add the WOW yourself, however.

I present to you: dated 70's hot air balloons currently on sale on our local craigslist for $20

CL hot air balloon art

I'm betting about 87% of you are questioning my vision right now.  Am I in the midst of a stroke?  Losing my eye sight?  Nope, I truly think these stuck-in-time pictures have potential.  With some modifications.  Something about the hot air balloons draws me to them.  Something about the current color scheme and the frame scares me away.

First, I'd start off by correcting the hideousness that's scaring me.  Paint the mat white and use a gold rub-and-buff on the frame.  Now the only color issues reside in the paintings/prints themselves.  My solution for this?  Dip it!

asn2505140057_1

image credit: insidecloset.com

In reality, the process would be less of a 'dip' and more of a 'tape off half the painting then use a brush or spray paint' but the effect is still the same.  Our previously questionably hot air balloons would suddenly look ethereal and modern.  Here is my not-so-perfect photoshop rendition to give you an idea of what the balloons would look like.  Picture the frames shinier and the paint wouldn't look so flat.

photoshopped-CL-hot-air-balloon-art

You could also take it one step further and stencil or paint on a favorite quote or phrase.  I like the idea of a tone-on-tone.

photoshop-overlay-hot-air-balloon-art via year of serendipity

Now what's one to do with this bizarre revived art set?

Personally, I think it would make the perfect statement over the sofa.  Large enough to fill the space, the new paint gives it a night weight, and it demands attention without screaming for it.

Make it Work: dipped art room vignette via year of serendipity

side table: target/frames: target/sofa: mitchell gold + bob williams/pillow: caitlin willson textiles/lamp: ikea

I know the dipped look isn't one to please everyone's tastes, but it's a great way to make a statement on a budget.

Are you on board or do you think it still looks like junk?  I'd love for you to weigh in!


A Stitch of Truth

Did you happen to catch a glimpse of my humble abode on Apartment Therapy's House Call on Saturday?  If you were busy making the most of your weekend, go check it out now! With colder weather peeking in lately, my knitting needles have come out once again.  For some reason I only knit on airplanes or in cold weather.  Well, after making hats for all my boys last Christmas (Hubby, Handy Dad, my nephew Eli, and his daddy Eric), I needed to spread the knitting love and make a hat to keep my cheeky new niece warm this winter.  I fell in love with this pattern on Ravelry.com and jumped in needles first, hoping that my hat ended up half as cute as the one on the pattern's adorable little model here.

ravelry-baby-turban-pattern

The knitting gods have other plans, I guess.

knit-fail

I SWEAR I followed this pattern to the T.  Clearly I'm not quitting my day job.  I was debating whether to share with you my knitting debacles, but I clearly decided to.  Often times DIY blogs are all styled, amazing projects and rooms and rarely do you see the dozens of false starts it took to achieve the perfect end results that you avidly pin.  Keepin' it real here as always.

My first, half completed attempt was scrapped mid-way because I thought the proportions looked off.  After assuring myself that the pattern had good reviews and that I should see it to the end, I gave it another go.  Aside from using a smaller needle to make the hat smaller than my first attempt(and apparently too small) this just ended up looking ridiculous.  Sometimes I will, admittedly, follow a pattern blindly, even if it doesn't looking right yet, because sometimes the textile reveals itself as you get in further.  This was not the case.  The only thing that revealed itself as I went further was a conehead and my dear Lyla did not deserve that.

I have started more than a half dozen hats in the past few weeks(this pattern and one other), the majority of which have found themselves in the trash, and my baby niece is still hatless.

knit-hat-false-starts

The most common issue I've had has been knitter error.  Since I'm a weeee bit OCD here, if I can't easily rewind to undo my stitch errors, I scrap it and start over.  Several times.  I stopped counting.  I'm also blaming the patterns for my inability to follow them properly.  Don't they know they need to SIMPLIFY so I can follow??

After my epic conehead failure, however, I think I know how to modify the pattern to actually be able to knit the desired result-  Less repeats and decreasing more gradually.

knitting-hat-take-million

No more blindly following the pattern.... I WILL make this one work!  (or give myself blisters trying)

Did you have any DIY misfires or successes this weekend?