DIY

Let's Get Catty- part 1

What crazy cat lady office would be complete without a custom diy cat perch? Custom DIY cat perch via Year of Serendipity

For many many years (ok, 5), we've put up with having a not so pretty brown cat perch hanging out in our home.  I'm pretty sure the people who mass produce affordable cat furniture are dog people who just want cat people to suffer with ugly cat accessories.  It's a valid theory.  But I kinda dig those crazy little furballs and they like sitting in the window, so it was a sacrifice that I was willing to make.

store bought cat perch via Year of Serendipity

Since I took the floor renovation as good excuse to redo my entire office, that meant it was time to do something about the perch too.  (side note: boy do I NOT miss that stained carpet, mismatched baseboard and exposed coax cable #rightdecision)

The only cost with this project was a few bucks for the shelf bracket.  I used a shelf I removed from the hall closet for the perch itself and scraps for the other supports.  After measuring the width of the window and marking my piece of wood, I also used a scientific tool for creating curves: I folded a piece of paper diagonally and cut out a curve and traced it...  Hey, it worked!

Custom DIY cat perch wood via Year of Serendipity

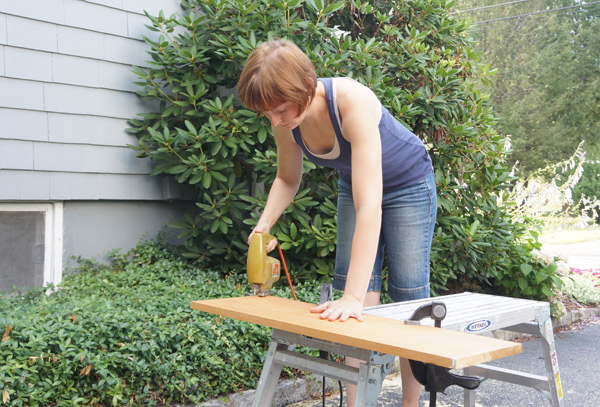
Once I had the shape all figured out, I brought out my delightfully modern jig saw.  Check out that avocado color!  Tres Chic!

Custom DIY cat perch cutting via Year of Serendipity

Slow and steady, I cut the curves and I smoothed them out a bit with my palm sander.

Custom DIY cat perch sanding via Year of Serendipity

My curves weren't perfect, but I decided not to stress about it- my intended audience wouldn't judge.  Actually they would, but not about a crooked curve- they're more likely to judge about why I haven't fed them yet.

Since my window sills have a bullnose edge to them, I wanted to match the edge here.  A router is one tool I don't have yet, so I always borrow Handy Dad's, but you could always skip this step and use sandpaper to ease the edges.

Custom DIY cat perch routing via Year of Serendipity

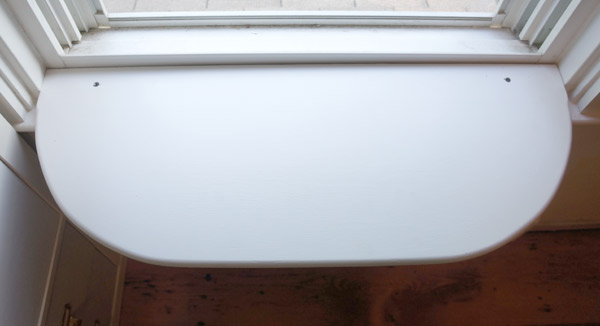
I routed both the front and back, then sanded quite a bit more.  Fast forward and the perch and a few support pieces (you'll see their purpose shortly) miraculously got 2 coats of Dune White trim paint.

Custom DIY cat perch painted via Year of Serendipity

For the install, I started by screwing the perch directly into the window sill.

Custom DIY cat perch screwed via Year of Serendipity

I was rather shocked at it's sturdiness already, so I made the executive decision to use only one shelf bracket below instead of the 2 I had originally planned.  This is also where the support pieces come in: I didn't want to cut out the window sill, so I needed a few spacers (out of scrap pieces) to make the bracket work.  I used this bracket from Home Depot.

Custom DIY cat perch via Year of Serendipity

It took them a few days to warm up to their new perch, but now, much like the old one, it's the place to be.

Custom DIY cat perch via Year of Serendipity

Aside from being much easier on the eye than the nubby brown one, this diy cat perch is also worlds sturdier than the last one.  If I could fit on it, it would hold me.  Too bad I only made it kitty sized.

Custom DIY cat perch via Year of Serendipity

I could keep talking about kitty perches for days, apparently, so I'll do exactly that- come back tomorrow for a quick post about how I made the coordinating cushion! UPDATE: check out the cushion how to here.

Save

DIY Wood Shutters

I was hoping to post these DIY shutters yesterday, but one of the downfalls of blogging in real time is that mother nature doesn't always follow my schedule. dori-ext-rain

BUT yesterday was gorgeous and I was able to install the shutters and take after pics to complete this DIY.  So let's start from the very beginning (a very good place to start).

This house NEEDED curb appeal.  It had curb unappeal before.  It was so bland that I knew I needed to throw some personality in somehow and adding something generic and store bought just wasn't going to cut it.  Enter: DIY shutters.

DIY shutters via Year of Serendipity

My original intention was to make the shutters out of cedar, but when shopping, the gorgeous Meranti Mahogany one bay over in the lumber isle screamed to me.  The graining was dreamy and they wouldn't need to be stained- SOLD.  Let me tell you- this is probably one of the simplest ways to make a big impact.  If you can cut a few pieces of wood and screw them together, you're gold.

Step 1:

Cut your pieces to size (and try not to swoon over the pretty mahogany...) and lightly sand off any rough edges or splintering.  I opted to cut my shutters to the height of the windows as opposed to the height of the trim and the horizontals slightly wider than the 3 boards side to side so there would be a slight space in between.  You'll need 3-verticals, 2-horizontals, and one spacer.  Make sure you have exterior screws to put everything together!

DIY shutters- pieces via Year of Serendipity

Step 2:

You'll be screwing the shutters together from the back side, so face nicer side of the wood (if there is one) down.  The horizontals go on the bottom and verticals on top, using the spacer to 'measure' the placement of the horizontal.  Screw the 2 outside vertical pieces to first one horizontal than the other.

DIY shutters- progress via Year of Serendipity


DIY shutters- progress via Year of Serendipity

Step 3:

Double check to see that your shutter looks square before installing the middle piece.  Since I cut my horizontals slightly wider than the 3 boards, I centered the last board in the gap, eyeballing it, before screwing it down.  Once all the pieces were together, I added a few more screws for stability, but you can put your power tools down for now (until we get to install)

DIY shutters- progress via Year of Serendipity

Step 4:

Flip them over and feel the pride of what you just made.  Gorgeous!

DIY shutters via Year of Serendipity

Step 5:

Seal them!  I had teak oil on hand, so that's what I chose to use.  A natural sealant will... well, seal the wood, bring out the natural color and graining, and highlight the richness of the wood.  Basically it seals it from the elements and makes it even prettier.  Apply several coats according to your desired finish and the directions of the product you're using.

DIY shutters- progress via Year of Serendipity

Step 6:

Install!!!  You'll only need your screw gun for this, and some more outdoor screws (I used decking screws that were already a brown color so they'd blend better)

Pre-screw the top 2 screws before climbing up on a ladder to make the juggling a bit easier.  Dropping screws while you're up on a ladder is fun for no one.

DIY shutters- install via Year of Serendipity

Now just line up your shutters and screw them to the house!!  note: make sure your screws are long enough to screw through any siding and into the structure behind.  If you have siding, you can use that as a guideline to align your shutters.

DIY shutters- install via Year of Serendipity

Step 7:

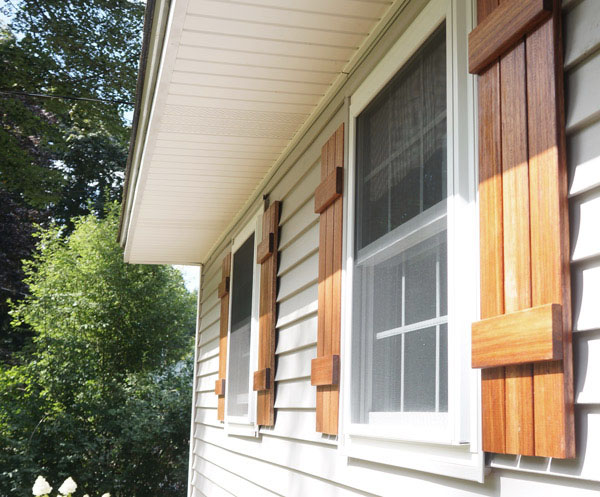
Step back and take in the visual awesomeness that your DIY shutters just added to your house.  You're welcome neighbors.

DIY shutters via Year of Serendipity

DIY shutters via Year of Serendipity

Now we just need a pop of color and some finishing touches!

DIY shutters via Year of Serendipity

All totaled for the wood and screws, this project came in at less than $200.  For something with such a huge impact on the curb appeal, I think that's some stellar bang for your buck!

DIY Herringbone Headboard

aka How NOT to Herringbone your Headboard (you'll see) DIY Herringbone Headboard via Year of Serendipity

You guys (almost) unanimously voted for me to make a herringbone headboard this past weekend.  It was kinda fun relinquishing the choice- should I make this a regular?

Anyway.... on to the headboard!!

Once upon a time, in 2008 when Hubby and I moved in together, we decided it would be delightfully adult of us to buy a matching bedroom set.  A very large black set.  I'd like to hop in a time machine and tell 2008/2009 Karen that matching sets are kind of a no no for an interesting space.  You can still see the basic black set in my (apparently outdated) home tour.  A year ago, I replaced the black box of a dresser with a sweet mid mod vintage wood one that I've shown you glimpses of:

figgy on mid mod dresser via Year of Serendipity

And I've been neglecting showing you the rest- I mean nothing's really changed in here just about 3 years.  So when we dismantled our bedroom to refinish the floors a couple months ago, I devised a plan for the bed.  We like the bed in general- it's a nice scale, has a nice solid frame, and a black leather upholstered panel in the headboard.  Well... had an upholstered panel...

Upholstered headboard before

When it came apart for the floor refinishing, I found out that the upholstered panel was simply screwed in and easily popped out.

unholsered headboard with panel removed

This opened up a world of possibilities and suddenly, I knew my plan:  a wood herringbone pattern to break  up all the black.

First step was to create a bunch of wood 'tiles.'  I used 2 1/2" pine lattice moulding cut to 12" pieces with my chop saw.  In what turned into a happy accident, I ended up with 2 different thicknesses by going to 2 different Home Depots.

wood tiles

After sanding any rough edges, I used a wood conditioner, then stained all the pieces with American Walnut.

DIY Herringbone Headboard via Year of Serendipity

Next came the fun part- making the puzzle.  For the backer, I used an 1/8" composite panel and got it cut to size at the Depot.  Once I had the tiles all cut and stained, I market the center of the panel and got to work laying the pattern out.

DIY Herringbone Headboard- backer panel via Year of Serendipity

DIY Herringbone Headboard layout via Year of Serendipity

I ended up alternating rows between the thinner tiles and thick and it added a wonderful dimension to the pattern.  Happy accident.  Once all laid out, I trimmed the edge pieces, eventually ending up with something that looked almost finished.  Too bad every piece was still loose.

DIY Herringbone Headboard puzzle via Year of Serendipity

Instead of adhering it out in the driveway and flat, I knew that the headboard had a slight bow to it, so I wanted to screw the backer piece on, and then adhere the tiles.  I numbered each tile by row so I could easily put the pattern back together and moved the operation into the bedroom.

Since the furry ones greatly enjoy a made bed, they opted to be my silent partners on this project and only gave me the evil eye when I moved the bed.

DIY Herringbone Headboard helpers via Year of Serendipity

Lazy bums.

Here's where the problems began.  I opted to install in place vertically since I was being lazy didn't feel like taking the bed apart and really have no floor space to lay the headboard.  It all started well and good: follow my numbering and use liquid nails to adhere the tiles...

DIY Herringbone Headboard glue via Year of Serendipity

I got all the tiles on and it was looking pretty darn good if you ask me.

DIY Herringbone Headboard glued via Year of Serendipity

So I decided to try gluing the trim pieces on...... and the headboard started spitting pieces at me.

DIY Herringbone Headboard issues via Year of Serendipity

My assistants were seriously NOT helpful.  Every time I tried to glue a piece back, 2 more fell down.

DIY Herringbone Headboard useless cat via Year of Serendipity

Here were my fatal flaws:

  • the flimsy paneling/backer just absorbed the adhesive
  • I may not have made the right choice in adhesive
  • in trying to save energy by taking the bed apart, I was trying to work against gravity.

Gravity+slow drying glue trying to stick to an absorbtive slightly curved panel= huge headache.

Luckily for me, I had picked up some small screws, so after a few curse words and a brainstorming call to my dad, I started by screwing pieces from behind to anchor them.  A few pieces anchored didn't help too much, but I could see that I was headed in the right direction.  I thanked my lucky stars for the 'accidental' thicker pieces and ended up screwing into the back of each and every one, effectively anchoring every other row.

DIY Herringbone Headboard screwed back via Year of Serendipity

The back isn't pretty, but if the tiles stay in place, I'll take it.  Yeah.... not the ideal way to herringbone your headboard.  Once everything was stable, I glued and clamped on the trim pieces and crossed my fingers.

DIY Herringbone Headboard clamped via Year of Serendipity

I'm pleased to say, with a combination of screws and glue, the tiles seem to be stable and the headboard made it through the night.

DIY Herringbone Headboard via Year of Serendipity

I actually really love the dimension created with the different thicknesses.  Let's pretend that was intentional.  Not seeing a generic upholstered headboard anymore is a big win.  The beauty is, however, if I ever changed my mind and wanted to switch this panel out again, I can remove a few screws and put the upholstered piece back or make a new insert.

DIY Herringbone Headboard via Year of Serendipity

Still to go with this bedroom mini-redesign is:

  • new or painted nightstands (out with the black!)
  • an area rug
  • new bedside lamps
  • reupholstering the bench at the foot of the bed
  • styling & accessories

DIY Herringbone Headboard via Year of Serendipity

Bear is excited, can't you tell?