Projects

More Office Progress

Since my last Office Updates post, not a whole bunch has changed.  I should really know better by now than to try and do any projects in my own home while in the midst of a flip.  While the to do list hasn't gotten shorter, I have been making progress towards completion now that I've shifted my focus back home. To recap and refresh your memory (since it was months ago and who can remember that far back)... so far this room has gotten:

-Uncovered and refinished 100+ year old wide plank pine floors (happydance)

-New baseboards and trim to match the rest in the house

-Repainted walls

-A new layout and new (to me) antique desk

-Cable ran through the wall so it doesn't wind around the entire room's baseboard anymore (another happy dance)

-Custom cat perch

-A new light fixture

office-progress-3

The remaining To-Do list for this itty bitty room is:

-Create cabinet to hide TV

-Make pillows for settee (one is made!)

-Make or buy roman shade

-Reupholster and put rolly base on vintage chair

-New knobs and paint cubby doors

-Way way in the eventual- refinish antique desk (so far in the eventual that it'll probably be 5 years away, but a girl can dream)

-Hang plants in corner next to window

-Metal pipe picture rail above settee

-Style and organize! (let's add a few !!!!! to this item for good measure since it's the most fun part)


A rather long list for a room that's less than 100sf, huh?  But it's doable... I just need to DO it.

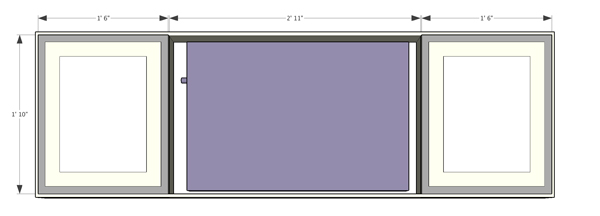
The first item on the remaining To-Do list Handy Dad is currently helping me with.  A custom TV cabinet.  Since this is my office primarily and den/tv room secondarily, I want to be able to cover up the tv with some pretty art and have it be out of sight out of mind when I need to focus on working.

After much debate and back and forth about how to engineer it, I ended up planning a shelf system with sliding doors.  I'll apply store-bought frames to the doors after construction and the art (hopefully) will slide with ease.  When the TV is in use, it will be framed out and flanked with beautiful art.

tv cab 1

When not, there will be a decorative shelving unit with statement art in the center.

tv-cab-2

Aside from gray frames and colorful art, the rest will be painted white to match the walls and trim and not get too busy.  Like I said... <100sf.

As for the statement art, I've been positively drooling over this art from etsy.

etsy-art

So far Handy Dad and I have solidified our construction plans and started to cut out all the pieces.  Hopefully we can start the assembly this week!

Flip Updates

I don't mean to leave you guys hanging with flips- I post a reveal and then say nothing else for weeks?  Not fair. Dori-after-kitchen-4

Well, Dori's still up for grabs.  The super hot summer market seemed to drop out the second we listed this flip.  Sad trombone.  While we're certainly antsy, we're still confident she'll sell for a decent price as soon as the right people see it.  Waiting isn't our strong suit, though.  Luckily we've moved on to other real estate distractions.

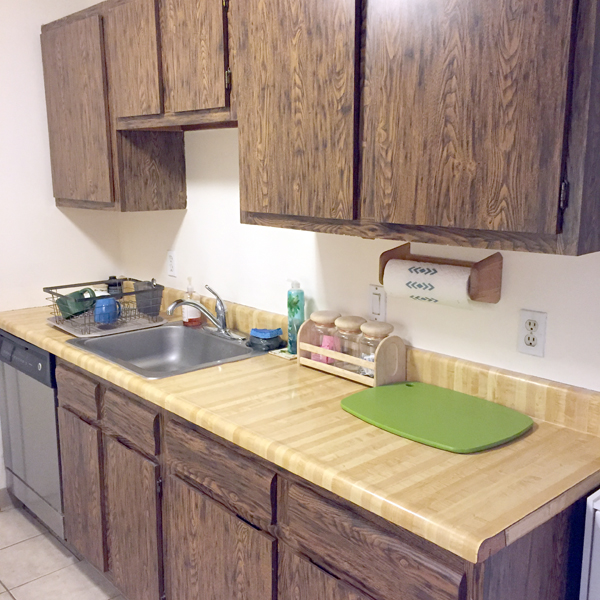
We're buying a condo!  Not to live in, but to rent out!  I'm taking off my "Nicole Curtis" hat and putting on my "Scott McGillivray" hat temporarily.  Rentals has been one of our goals since starting flipping and it was finally time.  I'm not going to go into toooo much detail since we won't officially own anything until the end of the month, but I see another kitchen renovation in my very near future.  Gotta make this tiny, gloriously '80s, laminate kitchen shine so that every renter ever will want to live here.

condo kitchen before1

condo kitchen before2

If you've ever watched HGTV's Income Property you know the caliber of the property will dictate the caliber of the tenant- and we want a good tenant!  I'm probably going to go pretty basic in here- white cabinets to the ceiling, subway tile (because I already have a stock of them and they'll look bright and nice), and granite countertops.  Granite vs. laminate was already a debate, but for such a tiny kitchen, the cost difference is so insignificant and granite will be longer lasting.  We're hoping that once we take ownership I can get my contractors in to bang this kitchen out so we can get it rented out for the beginning of the year- Fingers crossed!!

Until then, I'll be busy frolicking in this unseasonably warm weather we've been having this week.  Have a wonderful weekend!!!

DIY Wood Shutters

I was hoping to post these DIY shutters yesterday, but one of the downfalls of blogging in real time is that mother nature doesn't always follow my schedule. dori-ext-rain

BUT yesterday was gorgeous and I was able to install the shutters and take after pics to complete this DIY.  So let's start from the very beginning (a very good place to start).

This house NEEDED curb appeal.  It had curb unappeal before.  It was so bland that I knew I needed to throw some personality in somehow and adding something generic and store bought just wasn't going to cut it.  Enter: DIY shutters.

DIY shutters via Year of Serendipity

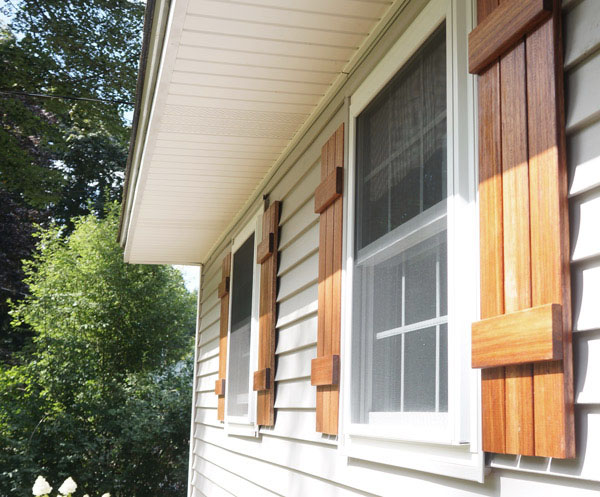
My original intention was to make the shutters out of cedar, but when shopping, the gorgeous Meranti Mahogany one bay over in the lumber isle screamed to me.  The graining was dreamy and they wouldn't need to be stained- SOLD.  Let me tell you- this is probably one of the simplest ways to make a big impact.  If you can cut a few pieces of wood and screw them together, you're gold.

Step 1:

Cut your pieces to size (and try not to swoon over the pretty mahogany...) and lightly sand off any rough edges or splintering.  I opted to cut my shutters to the height of the windows as opposed to the height of the trim and the horizontals slightly wider than the 3 boards side to side so there would be a slight space in between.  You'll need 3-verticals, 2-horizontals, and one spacer.  Make sure you have exterior screws to put everything together!

DIY shutters- pieces via Year of Serendipity

Step 2:

You'll be screwing the shutters together from the back side, so face nicer side of the wood (if there is one) down.  The horizontals go on the bottom and verticals on top, using the spacer to 'measure' the placement of the horizontal.  Screw the 2 outside vertical pieces to first one horizontal than the other.

DIY shutters- progress via Year of Serendipity


DIY shutters- progress via Year of Serendipity

Step 3:

Double check to see that your shutter looks square before installing the middle piece.  Since I cut my horizontals slightly wider than the 3 boards, I centered the last board in the gap, eyeballing it, before screwing it down.  Once all the pieces were together, I added a few more screws for stability, but you can put your power tools down for now (until we get to install)

DIY shutters- progress via Year of Serendipity

Step 4:

Flip them over and feel the pride of what you just made.  Gorgeous!

DIY shutters via Year of Serendipity

Step 5:

Seal them!  I had teak oil on hand, so that's what I chose to use.  A natural sealant will... well, seal the wood, bring out the natural color and graining, and highlight the richness of the wood.  Basically it seals it from the elements and makes it even prettier.  Apply several coats according to your desired finish and the directions of the product you're using.

DIY shutters- progress via Year of Serendipity

Step 6:

Install!!!  You'll only need your screw gun for this, and some more outdoor screws (I used decking screws that were already a brown color so they'd blend better)

Pre-screw the top 2 screws before climbing up on a ladder to make the juggling a bit easier.  Dropping screws while you're up on a ladder is fun for no one.

DIY shutters- install via Year of Serendipity

Now just line up your shutters and screw them to the house!!  note: make sure your screws are long enough to screw through any siding and into the structure behind.  If you have siding, you can use that as a guideline to align your shutters.

DIY shutters- install via Year of Serendipity

Step 7:

Step back and take in the visual awesomeness that your DIY shutters just added to your house.  You're welcome neighbors.

DIY shutters via Year of Serendipity

DIY shutters via Year of Serendipity

Now we just need a pop of color and some finishing touches!

DIY shutters via Year of Serendipity

All totaled for the wood and screws, this project came in at less than $200.  For something with such a huge impact on the curb appeal, I think that's some stellar bang for your buck!